Monday, December 14, 2015

Turning a Corner with a Couched Thread


Many geometric designs have a portion of the stitched design in which a couched thread goes all the way around the piece, in a square or rectangular shape.  A decorative stitch holds down the couched thread.  If I have not been too clear, this is what I mean:

Sue Reed's Harmony - Sea


Many thanks to Sue Reed for letting me use her beautiful piece Harmony - Sea to make a point.

Some may wonder, just how do you turn a corner with a couched thread, when the couched thread has to go down into the same hole that it comes up in.


If I diagram out what I am working with it looks like this:


There are several ways to handle this situation and many ways not to handle this situation.  The number one thing NOT to do is put a knot on the back of the piece at each corner to allow yourself to come up and go down into the same hole.

The most fundamental way to handle this situation is to start and stop your couched thread on each of the four sides separately.  That is too much starting and stopping if you ask me, but it will do the trick.  

A similar method, and I say similar because it leaves as much thread on the back as if you were starting and stopping your thread on each side, is to carry the thread along the back underneath where it will be couched.  This is what I mean:


There is absolutely nothing wrong with this technique.  It does leave a lot of thread on the back, but that thread will be tacked down by the same stitches that you use on the front to tack down the couched thread.  

For those of you who do not want to have a lot of thread on the back there are other techniques to try: using a tacking stitch to turn a corner and backside couching.  First the tacking stitch method:


For a close up of what is happening at the corners:


With this method, you bring your needle down into the hole marked “2”, take a tacking stitch (3-4) and then bring your needle up at “5”, which is the same hole as “2”.  This method does not work all the time, especially with heavy threads because the tacking stitch will create a lump if the thread is too thick.  Perhaps the couching stitch would hide the tacking stitch lump, and it may, but there is a third method that works well with heavy threads - the underside or backside couching stitch.

Here is how that stitch works - you need to work with two needles simultaneously, the couched thread needle and the couching thread needle.  The couching thread needle goes up through the hole marked “a” in the canvas and then you loop the couching thread around the couched thread and take the couching thread needle down into the same hole, marked “a”.  Pull on the couching thread until the area in which the couching thread loops around the couched thread “pops” through to the back of the canvas.  You may then neatly turn the corner.  The entire length of the couched thread stays on the front of the canvas (the couched thread needle never is taken to the back of the canvas until you get to the very end), only the little area with the loop around it is on the backside.

It may be easier to follow the diagrams than the written instructions:


The backside couching technique works best with a thicker couched thread, so that the two threads fit snugly into the hole and provides stabilization for maintaining stitch tension.


Saturday, October 25, 2014

It Never Hurts to Plan Ahead

I started stitching today, filling in an irregular shape with a composite stitch.  Here is my irregular shape:

Line Drawing of Shape to Fill


 And here is the stitch I am planning to use to fill in that shape:

Composite Stitch

This type of a stitch is called a composite stitch.  It is really made up of two separate stitches - an upright cross stitch (in blue) and a plaited cross stitch (in red):


Upright Cross Stitch                                      Plaited Cross Stitch
Here is a diagram of the entire composite stitch pattern:

Composite Stitch Pattern
Many times when stitching composite stitches, the stitcher chooses to stitch all of the first stitch to fill the area as Step 1.  Then as Step 2, complete the stitch by stitching all of the second stitch over those stitches of Step 1.  Here is how Step 1 would be diagrammed:

Step 1.  Upright Cross Stitch
Then for Step 2, stitch the plaited cross stitch over the top of the upright cross stitches:

Step 2.  Adding Plaited Cross Stitches over the top of the Upright Cross Stitches
I’m thinking - no problem, this should not be hard to compensate.

So I start filling the area with the first stitch, the upright cross stitch.  Here is my stitching so far - an easy stitch to compensate.

Step 1.  Stitched Area

Now I start to overstitch that first part with the plaited cross stitch, I know how to compensate this one too, so I am not concerned.  

Until I get here:

Arrow Points to Compensation Problem
Now I have a dilemma.  This next stitch needs to go through the canvas hole where the arrow is pointing but the metallic braid from Step 1 lies across it, as well as the red thread from Step 2.

Well, that creates quite a problem.  I have stitched the whole upright cross (blue) stitch section already, and to take out that one stitch is going to cause me to take out many more stitches.  I have a choice here:

  1. Go ahead and stitch around or through the threads that cover that hole in the canvas.  Not really a good choice, it will distort that stitch and make it look not quite right.
  2. Take out a few of those upright cross (blue) stitches and fix the mistake.  And my mistake was to  only think about the compensation of the upright cross (blue) stitches when I needed to think of the compensation of both the upright cross (blue) stitches and the plaited cross (red) stitches simultaneously.  Sigh . . . 

OK, I did not plan well.  

Plan Ahead!

Here is how to approach this type of a stitching situation prior to actually starting to stitch:
  1. Recognize that compensation is necessary.  If this is a composite stitch, any one of the stitches, or all of the stitches that make up the composite stitch, may need to be compensated.  And any of those compensated stitches may affect any of the other stitches in the composite stitch.
  2. Either
    1. Use two needles simultaneously and stitch as much of a line of stitches that will not be compensated in the Step 1 all upright cross (blue) stitches, then Step 2 all plaited cross (red) stitches method.  At any area that needs to be compensated, stitch each composite stitch with all of the compensation needed in its entirety before moving onto the next composite stitch.  Here is what I mean for this example:
Stitch first and second row by stitching upright cross stitches (blue) stitches first then
                the plaited stitches (red) stitches.  No compensation in the first two rows (I am ignoring
                the left side edge for this example). 
                At row three, the first compensated stitch that will cause a problem is here.  Stitch 
upright cross (blue) stitch, compensate it for the size of the area to be stitched and note 
where the plaited cross (red) stitch is going to have to be compensated.  That means you 
will have to divide the horizontal portion of that upright cross (blue) stitch into two stitches.  
                Stop.

Diagram of Step 1 of Compensation in Row 3
              
                Now stitch the plaited cross (red) stitch, compensating it.
With this method, you will stitch at most one upright cross (blue) stitch before you 
                realize that the plaited cross (red) stitch has to be compensated, and the upright cross 
                (blue) stitch interferes with the compensation of the plaited cross (red) stitch. Therefore
                you will only need to unstitch the upright cross (blue) stitch to resolve this compensation
                issue.  If no more compensation is needed you can go back to the Step 1 stitch all upright
                cross (blue) stitches followed by Step 2 all plaited cross (red) stitches until you reach the
                next composite stitch that needs to be compensated.

Diagram of Step 2 of Compensation in Row 3

 - OR -

        b.  S
titch only whole composite stitches for the entire area, i.e. no compensated stitches, in
                 a 2 step method (first stitch all upright cross stitches then stitch all plaited cross stitches).  
                 Once all the whole composite stitches are complete for the entire area to be stitched, switch
                 to the two needle method to add all composite stitches one at a time.  As before, you will 
                 at most stitch one upright cross stitch before you realize that you need to unstitch it because 
                the plaited stitch needs to be compensated and the upright cross stitch interferes with that 
                compensation.

Your stitching will look much better with just a little bit of planning ahead.


Friday, June 27, 2014

The Large Cross Stitch and Hiding Travel Threads - Part 2

Consider approaching the execution of the large cross stitch in this way:


What is different here?  Well, look at a stitched sample:

Cross Stitch Executed in a Chevron Style

This is indeed a cross stitch shape, but the execution is a zig zag stitch or Chevron pattern.  The nice thing about this form of execution is that you do not see any travel threads that are on the back of the piece because it is executed with backstitches.  This is what the back looks like:

Backside of Cross Stitch Executed in a Chevron Style - All Backstitches


The question that you need to ask yourself is whether this type of execution is a problem.  Do you want a crossed stitch or do you want a cross stitch shape?

Many times the large cross stitch is used with the center area stitched over with another decorative stitch, which hides whether the stitch is really crossed or not.  Here is an example with an upright cross stitch:

The Upright Cross Stitches Hide the Intersection of the Backstitches at Center of Cross Shape

Oops!  See what is visible here?  A travel thread from upper right to lower left, however, the travel thread from upper left to lower right is well hidden.

Here is the backside:


Backside of Cross Stitch with Intersections Covered


Hiding that travel thread that shows through to the front would not be hard - just whip the red thread to the line of metallic threads on the back using a piece of sewing thread or one strand of cotton floss the same color as the canvas.

Consider using this form of stitching when you are working a laid filling pattern with diagonals in both directions.  These types of patterns most often have that middle “crossed” intersection covered by a decorative stitch.  Many stitchers find that compensating these laid patterns difficult, especially when the area covered by the stitch is not square.  There is no shame in stitching the pattern this way - it is simply a variation, or a “faux” cross stitch or “faux” diagonal laid filling pattern.  I teach laid fillings this way all the time.  I don’t want anyone to get so hung up on counting on the diagonal that they miss the fun of working the stitches.


Thursday, February 20, 2014

The Large Cross Stitch and Hiding Travel Threads

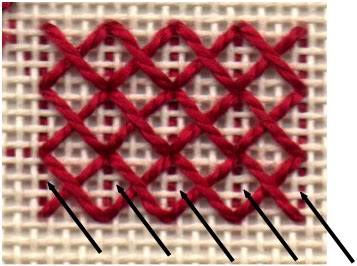
When stitching a cross stitch over two canvas threads, the density of the thread on the top of the canvas usually hides the travel of the thread on the back of the canvas.  However, the larger the cross stitch,  more of the canvas is visible - and so are those travel threads.  Take this example:


Visible Travel Threads Along Vertical Stitching Path for Large Cross Stitch

The black arrows are pointing to the visible travel threads between each large cross stitch unit - and the larger the cross stitch, the more obvious the travel threads.  

Here is how I stitched the cross stitch like this:

Diagram of Large Cross Stitch

What if you do not want that travel path visible?  Look at this example:

Large Cross Stitches with Hidden Travel Path

The black arrow shows a hint of thread from the back, but this is where I pulled the thread to the outside area to end it.  What I want you to look for is those vertical threads that showed through from the back, as seen in the previous example.  What did I do to hide them?  

Look at how I stitched this sample:

Alternate Pathway to Stitch Large Cross Stitch

See a difference?  First of all I stitched the cross stitches so that there was a diagonal backstitch on the back of the canvas (behind the stitch 3-4 and 5-6).  Then I had to slide the 5-6 stitch under the 3-4 stitch.  Then I pulled the vertical thread (created by traveling from 4-5) to the middle of the cross stitch and tacked it to the diagonal thread on the back using sewing thread to hide it.


Tacking Stitch on Back with Sewing Thread

Now you may be thinking, oh for goodness sakes, I am not going to go to all that trouble!

Well, it is a bit more work, and if you are laying threads, it is a lot more difficult to slide the thread underneath a stitch and make it look nice.  

Thankfully, when stitching very large cross stitches, they usually do not stand alone, but involve other stitches on top of them (stitches made from one or more stitches on top of other stitches are sometimes called Composite Stitches) - and that is where you can hide travel threads.  In the next blog posting I’ll cover that topic.


Thursday, January 30, 2014

Travel on the Diagonal

Threads are easier to hide if they are pulled diagonally as opposed to horizontally or vertically - and the diagonal does not have to be 45 degrees either.

Here is an example of hiding travel threads by pulling the thread on the diagonal. The openwork pattern in the background makes it necessary to very carefully hide travel threads. I could have stopped and started each vertical thread behind the fabric, but this would mean a HUGE bump behind each of those pieces of fabric. The vertical stitches are stitched with #16 Kreinik metallic braid. That is a fat thread! I pulled it behind a diagonal line of upright cross stitches to the base of each vertical stitch.


Example for Hiding Travel Threads

I had to place a tacking stitch underneath the vertical stitch to line it up. The tacking stitches are placed underneath the green vertical lines and the threads are pulled behind the pink lines.


Placement of Tacking Stitches and Travel Threads

I was amazed myself at how well it worked.

Now look at the middle vertical stitch again without the lines drawn over it. Do you see any issues with this stitch? Mistakes like this are great for teaching, because if I make this error, others will too. 

Really Annoying Mistake!

The vertical thread was caught by the cross stitch variation (gold thread) that is holding down the piece of fabric. See how the blue metallic thread is pulled to the side and is no longer vertical? You can even see the tacking stitch. Ugh! Don’t you just hate that when you see a mistake AFTER the framing? I should have been more careful when stitching with the gold thread and this mistake would not have happened.

But as long at it is there - it is a teaching opportunity!


Why?

Open canavs work, where unstitched canvas is visible, requires the stitcher to take extra care to hide travel threads.


When I see a piece that has this mistake, a glaring, obvious mistake in the midst of an otherwise well stitched piece I just cringe.  Why did the stitcher do this?


Why?


The arrows point out travel threads in this Milanese Pinwheel stitch and mar the beauty of this stitch.  Why is the travel thread only visible for the pink thread?  

Perhaps the variegated thread was stitched first (which it should be because it is lighter in color and if pink thread was pulled under the lighter thread it would be seen from the front) with all stitches going down into the center hole, which allows the stitcher to pivot to the next stitching area and hide the travel thread.

How are the pink stitches executed?

Probable Stitch Execution
I can’t be completely sure, but this is how I think it is stitched, with the arrows showing the stitch  direction.  This leads me to think, Be Consistent!


Probable Stitch Execution of All Stitches

All stitches for each Milanese should be executed in the same direction.  All long threads going down into the center hole, which again, allows for a correct pivot to the next Milanese stitch.

If you must change the stitch direction - and it really should be for a very good reason, then placing a tacking stitch underneath the pink thread, between Milanese Stitch units, is essential to hide the travel threads.  You may have to push the pink thread aside to access the canvas holes to take this tacking stitch.  Here is where the tacking stitches should be taken:


Where to Place Tacking Stitches

Each of the black lines indicate where a tacking stitch should be placed under the pink stitches.  Pink is much darker than the light variegated thread, so tacking stitches need to be made under the pink thread.  Place the stitches below where the variegated stitches cover the canvas, so that when the thread is pivoted to take it to the next Milanese Stitch area, the travel thread will lie behind the variegated thread.

One of these two simple steps - maintain a consistent stitch direction with all long stitches going down into the center hole or place a tacking stitch - will easily fix this problem.


Wednesday, December 18, 2013

Keep Compensated Edges Neat and Clean

Compensated edges should look neat and clean - just what do I mean by this?


Let’s look at a stitch sample:

 
Stitch Sample

As you can see, the bottom edge is compensated, let’s take a closer look:

Travel Thread Showing Through from Back
The reason we see this thread is that the compensation edge from the green stitch travels along the back behind the holes in the canvas at that bottom edge.  

Path of Travel Thread

You really do not want anything to show behind those holes:

No Travel Thread Showing

If you look carefully at this sample you may be able to see just where that thread travels:

Travel Thread Behind a Stitch

If you see travel thread showing through along the bottom edge of a compensated area you have several choices to fix the problem:
  1. Pull that thread up with other stitches, 
  2. Purposefully find a new, hidden travel path by turning the canvas over and running the thread behind other stitches (while you are stitching with that thread), 
  3. Or after stitching use a length of sewing thread and whip those stitches out of the way (this will only work if you have not caught the travel thread in stitches from other sections - in this case the cross stitch variation).

A little extra work with making sure your compensated edges are clean and neat will make a big difference on the quality of your work.


Tuesday, November 26, 2013

Hiding Travel Threads

Here is an example of a couched thread (blue/green metallic) with a red couching thread that holds the metallic thread in place.  Red thread is so great to highlight problems in your stitching.


Comparison of Two Couched Threads

Which sample looks better, 1 or 2?

Sample 1 is a typical sample that most stitchers create.  Let me point out a few problems and then I will show you how to change Sample 1 into Sample 2.

Sample 1 With Problems Pointed Out
The black arrows point to travel threads showing through to the front and the blue arrow shows a sag in the couched thread.  These issues are not visible in Sample 2.  

If we look at the back of Samples 1 and 2 we will see why this is the case.

Comparison of Backside of Couched Threads

The backside of Sample 1 shows a vertical stitch, then a diagonal line of thread then a vertical stitch.  This diagonal stitch is why you see the thread showing through to the front.

The backside of Sample 2 shows two vertical stitches followed by a horizontal line of thread then two vertical stitches.  I have used sewing thread in the same color as the canvas thread to tie the diagonal line of thread to the vertical stitch in order to hide it behind the couched metallic thread.

Looking at the backside of Sample 1 only,

Fixing Sample 1 With Sewing Thread
I have placed a black line where I tied the threads on the backside together with the sewing thread.  I did a simple buttonhole knot with the sewing thread.  This simple step will clean up any travel threads that show through to the front from the couching.

There is one more issue to mention, the blue arrow is pointing at the metallic thread.

Another Problem with Sample 1 - Thread Sag

Do you see how the metallic thread dips here?  That is because the couched thread is not taut.  Always pull the couched thread taut prior to placing the tie down stitches, the couched thread here should lie straight in the channel between two horizontal canvas threads.


Wednesday, June 12, 2013

Compensating Diagonal Stitches - Part 2


This blog post is a continuation of compensation of diagonal stitches (on the true diagonal) for unusual shapes - arguably one of the more difficult areas of needlepoint.

Here is my shape that I want to fill.  And this is important - I want to fill this shape.  What does that mean?  That means I want to cover all those lines that are drawn on the canvas.  Many times the stitcher wonders if the lines should be covered or not.  Ask yourself, are you filling the shape or surrounding the shape or stitching next to the shape?  If you are filling the shape, cover the lines.  If you are surrounding the shape, or stitching next to the shape, do not cover the lines.

Initial Shape - To Fill

As said in the previous blog post, Compensating Diagonal Stitches - Part 1, begin stitching in an area that will give you a long enough line of stitches so that you can establish the stitch pattern.  Again I am using the Diagonal Scotch Stitch, though this technique will work for any diagonal stitch on the true diagonal.  So here is my first row of stitching:

First Row of Stitching
Notice that I am covering the lines.  The second row begins below the first row, and I choose to stitch the small tent stitch underneath the longest stitch of the previous row to start my stitch pattern.

Second Row of Stitching
The green arrow above indicates my starting point.  I don’t want to start where I need to compensate, I want to start where I know it is easy to establish the stitch pattern.  

Let’s look at the third row:

Third Row of Stitching
OK, now in this third row I have encountered my first real problem - indicated by the green arrow.  How long should this compensating stitch be?  Well, I”m not really sure.  This is where a lot of angst comes in for the stitcher.  Here is my advice, err on the side of caution - place a shorter stitch here if you are not quite sure, or skip this stitch for now and see how the curve develops with further rows of stitching.  If you skip this stitch, just remember to put it in later, if you place a shorter stitch and you really feel that to achieve a nice curve, a longer stitch would have been better you can fix it.  How?  

Shhhh... Don’t tell anyone, but place a longer stitch over the top of that tent stitch.  Watch the tension of the stitch so it lies nicely next to the stitches on either side, but in the end, no one will know what you did.

Does that surprise you?  

Confidence in knowing what to do in these situations is a difference in experience.  Learning tips, tricks and techniques for different complicated issues will allow you to gain confidence and tackle these problem areas without hesitation.

Another thing about this row, I stopped stitching when the next stitch is not contiguous with the previous stitch - I’ll just add those stitches later.  Notice this curve bends inward.  If I drag my thread to the next stitch in this row, I may have that thread run behind an open area, or an area with a lighter thread in color and it may shadow through.  Safer to fill it in later.

OK, let’s look at the next row:

Fourth Row of Stitching

The green arrow in the fourth row of stitching points to my starting point.  Am I concerned that I did not start lower down, because there is all that canvas below the green arrow that needs to be filled with this row of stitches?  No, I want to start stitching where I know that I can accurately begin my stitch pattern, and for me that’s the first tent stitch underneath the longest stitch of the row above it (here the longest stitch is a compensated stitch, so perhaps I should refer to it as the corner stitch.)

Let’s look at the next row:

Fifth Row of Stitching

Nothing very interesting here, just notice that I am at the bottom of the shape and the last two stitches are compensated, that’s what the green arrow is pointing to.

Filling in the last row of stitches:

Sixth Row of Stitching

I am now at the end of my regular stitching, defined as stitching below the previous row, and I need to fill in those open areas, most will be compensating stitches.

Where do I go from my last stitch?

Here is what I would do if I still had thread in the needle with which to stitch.


Seventh Row of Stitching

I have three arrows included in this diagram and they indicate where to place tacking stitches on the back of the canvas.  Remember that you want the pull of the last stitch to be consistent with the stitch before it so after stitching the last blue stitch in that corner, I place a tacking stitch at Arrow A.  This tacking stitch will maintain the downward pull on the last stitch in the corner.  I then travel up to number 1 and place those two tent stitches.  (There is really no good place to put a tacking stitch before placing the stitch at number 1, and my thread is coming from below that point so I will let it go.)  I need to place a tacking stitch at Arrow B to maintain the downward pull on that last tent stitch (ending at number 4) prior to moving to the stitch starting at the number 5.  However, I need to change the direction of the pull on that thread traveling across the back of the canvas, and need to place a tacking stitch at Arrow C.

Got that?  Sometimes one tacking stitch will do, but sometimes you need two tacking stitches.  Always look at the pull on the last stitch before traveling to a new location, and then again, look at the pull on the first stitch at your new location.  Both of these stitches must match the pull on the stitches as if there was no break in your stitching from one diagonal row to another.


OK, now the eighth row:

Eighth Row of Stitching

Oh dear, here is another compensating stitch in which there is not a definitive answer to the length of the stitch (green arrow.)  However, I am looking at the drawn line and it looks like it is pretty straight along this area, and I want my stitches to follow the line, not stick out from this line.  So I think that a stitch over one canvas thread will work well here.  Again, I will not know for sure until I stitch the whole area.

Moving on to the next row:

Ninth Row of Stitching

Remember to place tacking stitches!  OK, now I have moved down to the bottom of the shape and put in the brown stitches.  The green arrow is pointing at a last compensating stitch that needs to be placed.  Again, it is not completely obvious that the stitch goes there, but if I want to have a curve there I had better put that little tent stitch in - which is shown in the next diagram.

Tenth Row of Stitching

I have now filled in all of the compensating stitches for the bottom part of the shape and now must move to the top part.  My advice is not to pull your thread on the back all the way to the top, but end your thread at the bottom and begin a new thread.  

I am showing all the rest of the stitches that fill in the shape in the final stitch diagram:

Filled in Compensating Stitches for Top Part of Shape

At this point you can look at your filled in shape to determine if you have achieved a nice curve or need to adjust some of those compensating stitches.  We will look at that issue and a way to smooth out curves in the next blog post.