Saturday, March 30, 2013

Book Review - Chinese Lattice Designs CD-ROM & Book by Dover Publications, Inc.


Chinese Lattice Designs CD-ROM & Book by Dover Publications, Inc.
Softcover 2008.  $16.95
ISBN-13:978-0-486-99885-5


Chinese Lattice Designs is a compilation of 191 royalty-free images of centuries old Chinese window grids.  While some patterns have a distinct oriental feel to them, others do not.  Many of these patterns may be seen today in stained glass windows, architectural ornamentation, mosaic tiles and in textiles of all kinds.  The needleworker may look to these intricate and harmonious patterns to provide inspiration for embroidery.

In 1909, Daniel Sheets Dye traveled to China in order to establish a medical school.  In his spare time, Dye traveled throughout western China and recorded the geometric shapes he saw in the windows of Chinese homes, temples and businesses.  Dye spent more than two decades collecting over 1000 designs from windows constructed between 1000 BC and 1900 AD.  These windows, made from a decorative wooden lattice with a sheet of rice paper glued to the inside, let in light, but not the sights - there were no glass windows.  Carpenters created these lattice windows from folk designs passed down through generations, and as such they were not considered art.  However, these windows testified to a Chinese craft design which excelled in creating a balanced geometric space.  

Dye’s ability to see the beauty in the abstract shapes in Chinese windows and his passion to record the designs provides us today with a wealth of inspiration as needleworkers.  Many of the designs may be directly translated into a stitch pattern.  The lines may represent vertical or horizontal stitches, as well as diagonal stitches.  Other patterns may provide a whole design area that needs to be filled with stitches.  From simple to complex, the needleworker may use these lattice designs to create a stitch pattern or a whole design with an oriental style. 

Dover Publications has a wealth of books with patterns and designs in many different styles.  Needleworkers may peruse their large list of books as a kick start to creativity.  It is interesting to note that similar patterns are viewed as folk designs in many different cultures, perhaps springing up independent of each other.  For instance, the interlace pattern found in old Celtic artwork is similar to the Chinese interlace designs.  Did one culture influence the other, or were they created without interaction between the two peoples?  These answers may never be known, but is an interesting conundrum to consider.


Saturday, March 23, 2013

Stitch Compensation Cautions


This post is a small departure from the discussion of compensation of specific stitches and is more of a caution than anything else.

Here is the background:
I’m trying to design a needlepoint piece using Frank Lloyd Wright patterns found in stained glass windows - for ANG’s seminar in Chicago in 2014.  Here is one of the patterns:

Looking at Compensation of Cross Stitch Variation
The red arrow points to the first Cross Stitch Variation, the blue arrow points to where a compensated version of this stitch needs to be placed.  

Here is the stitch diagram:

Cross Stitch Variation

The compensated stitch would only be two threads wide, not the six threads that make up the whole stitch.  I tried every trick I knew to determine where to place the threads and it would not work.  UGH!!!

So what did I do?  I put this piece aside for now.  It will have to be rethought and redesigned and will not make the Chicago seminar.  

Compensation can be very difficult and may not always work out - which is my caution for today.


Wednesday, March 20, 2013

Herringbone Stitch Compensation


For this blog posting I am going to concentrate on the Herringbone Stitch.  There are many variations of this stitch, depending on the slant of the stitch, the width and the height of the stitch, as well as the numbers of threads in the separation of each “v” of the stitch.  Compensation must take into account all of these variations, there is not one way to do it for every variation of the stitch.

Let’s look at the Herringbone Stitch that is two threads high and two threads wide:

Herringbone Stitch - 2 wide x 2 high

The red lines show the compensating stitches.  Since this stitch follows the 45 degree diagonal of the square grid, the compensation is straight forward and no guessing is needed.

Here is a stitched sample:

Herringbone Stitch - 2 wide x 2 high

Looking at the back of the canvas:

Herringbone Stitch - back of canvas

There is not much thread on the back of the canvas to weave in ending threads.  In fact the stitches on the back of the canvas are over one thread. 

Let’s look at two difficulty issues that the Herringbone Stitch may cause:
  1. It is hard to end threads on the back of the canvas.
  2. The step back stitch (as in going from 2 to 3), the thread goes back one canvas thread and many times it can be pulled under the thread that is supposed to separate where the needle went into the canvas (at point 2) and where it is brought out of the canvas (at point 3.)


For Point 1:
The first piece of advice that I can give about weaving in ending threads is :  get a sharp needle - a crewel needle or an embroidery sharp needle is better than a sewing needle, but that will work too.  The embroidery sharp needle is the easiest to use because the eye of the needle is as large as a tapestry needle.

Let’s look at a stitched Herringbone Stitch sample:

Herringbone Stitch ending threads showing through to front of canvas

The arrows are pointing to ending threads showing through to the front of the canvas.  Let’s look at the back:

Red arrow - ending threads diagonally on the back of canvas
Blue arrow - ending threads horizontally on the back of the canvas

This is the back of the sample and you will notice that you do not see the ending threads on the left side of the stitching where the ending threads are woven into the stitches on the back (and I had to use a sharp needle because there is not much thread on the back of the canvas.)  Notice that ending the threads horizontally means that the ending threads show through to the front.  It is much better to end the threads on a diagonal on the back, meaning you have to weave through a top stitch, then a bottom stitch, then a top stitch, etc.

Other options for ending threads - weave them into stitches next to the Herringbone Stitches.  This is an option, but unless I absolutely have to (like for darning stitches) I always try to end threads behind the stitches that the thread was used to stitch them.  Why?

First, I don’t have to worry about thread shadows showing through stitches with lighter colored threads.  Second, if I have to rip out stitches, I don’t want to disturb stitches in surrounding areas - this just makes it easier for me.  If you’ve ever ripped out stitches and had all these ending threads in them from other areas you’ll know that this can really be a problem.  Maintaining stitch tension on those stitches from surrounding areas is nigh impossible.

Now for Point 2:
Having threads slide under the intersection of the canvas thread is a pain.  Let’s look at the canvas:


Canvas thread on top is vertical

When the top thread is vertical, any stitch over one horizontal canvas thread (as in the Herringbone example above) may slip under that vertical canvas thread.  This usually happens when the area you are stitching in has been disturbed (as in ripping out stitches and stitching over the area again.)  Canvas has some starch in it and that makes the canvas threads “stitck” a bit to each other when you first stitch on the canvas.  However, if you break this bond, then threads can easily slip around, as well as disforming the canvas threads with tight stitching tension.

This is a problem with a linen ground fabric also.  People who work on linen have to take more care in their stitching tension than canvas stitchers.  So watch your tension.

Try not to start a horizontal run of Herringbone Stitch that has an over one canvas thread stitch across the back of the canvas with a vertical stitch on the top.

If you are stitching Herringbone vertically, the opposite is true, don’t have the top canvas thread be a horizontal thread if you have an over one stitch on the back of the canvas.

Canvas thread on top is horizontal

Now let’s look at a variation of the Herringbone Stitch that is not square.  

Herringbone Stitch - 3 high x 4 wide


The important issue with respect to any stitch that is not a a true diagonal - the compensated stitches must have a slant as close to the slant of the original stitches.  I drew the compensating stitches in the diagram in red using the same angle as the original stitches to find where they would enter the canvas.  Let’s look at a stitched sample to determine if the slant is correct.

Herringbone Stitch - 4 wide x 3 high - Arrows pointing to compensated stitches


The compensated stitches are executed with white thread so that they stand out.  I will look at the slant of these stitches to determine if they are correct.  With this sample, I am happy with the slant - that is the only way to know if a compensated stitch will work - look at the slant of the stitch and compare it to a previous whole stitch. 


Friday, February 15, 2013

Van Dyke Stitch - Beginning Compensation

A reader asked about compensating the Van Dyke Stitch at the beginning of the column.  Yes, it needs to be compensated there also.  Here is a diagram of that compensation:

Compensating Van Dyke Stitch, Beginning of Column

I've shown the compensating stitch in blue and the first regular stitch in red.


Thursday, February 14, 2013

Stitch Compensation - The Elongated Cross Stitch


Let’s look at the Elongated Cross Stitch.  I was actually stitching the Van Dyke Stitch, which is a column of overlapping Elongated Cross Stitches when I had to compensate the stitch at the bottom of the column.  The Van Dyke Stitch looks like this:

Van Dyke Stitch
You may wonder about my unorthodox numbering system for each of the Elongated Cross Stitches - well I want to create a backing that is easy to start and stop threads in.  As long as I am consistent in my execution, it does not matter how the cross stitch is executed.

Anyway, let’s say the next stitch in the sequence is compensated, just how do I do that?  Have you heard someone say that you just place something, like a piece of paper, over the stitch diagram where the stitch ends and that will show you how to place the compensating stitch?

OK, let’s try that:
Compensated Van Dyke #1


I’ve indicated the compensated stitch with blue color.  But what if I placed my piece of paper in the middle of the last row of the diagram and not at the end of the row?  Well, then the compensation would look like this:

Compensated Van Dyke #2


Which one is correct?  

You know what?  I don’t know off the top of my head, I have to stitch both to see which one looks better.  Does that surprise you?

Comparison of Compensated Van Dyke Stitches
#1                                                       #2   


The above picture shows both types of compensation, #1 on the left and #2 on the right.  To determine which is the best way to compensate the stitch I have placed an arrow at the top stitch of the compensated stitch.  I am going to compare the slant of this stitch with the slant of the same stitch above it, which was not compensated.  It looks to me that #1 has a better slant to it than #2.

I am not done though.  There is one more stitch to compensate.  Again let’s look at the diagram:

Comparison of Second Stitch Compensation
#1                                                      #2


The second compensated stitch is in green.  Again, I am going to look at a sample of the stitched compensation to make my choice.

Comparison of Second Stitch Compensation
#1                                                              #2

Look at the slant of the stitch where the arrow is pointing, and compare it to the slant of the stitch above it.  In this instance, #2 looks better with respect to the stitch slant.

Many people would have liked #1 because it closes up the bottom of the column of stitches.  I understand that issue, but once you have all the other stitching done around the Van Dyke stitch, and you thought the bottom needed to be closed up more for example #2, then you could backstitch across the bottom with a strand or two of cotton floss in the same color as the thread for the Van Dyke stitches.  

However, remember that a cross stitch, even an elongated cross stitch, it not completely closed at the top or the bottom.

So my advice about compensating any stitch, when it doubt, stitch it each way and look at how the compensated stitch lies compared to a whole stitch.  Non-symmetrical stitches can be a little tricky to compensate because the canvas grid is a square while the stitch is not.


Friday, January 4, 2013

Stitch Compensation - The Cross Stitch

Let’s start the New Year with some blog entries about stitch compensation.  Many people do not like stitch compensation, nor are they very good at it.  It is my hope that I can help you learn how to figure out just what is the best way to compensate a stitch.

The next 4 blog entries will deal with 4 crossed stitches in depth and issues with their compensation.  The stitches will include the cross stitch, the elongated cross stitch, the herringbone stitch and the Rhodes stitch.  Hopefully, moving from an easy stitch to more complicated stitches will help you learn the thought process behind stitch compensation.

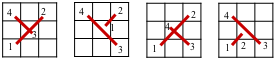
So, let’s start with the basic cross stitch over two canvas threads:

Cross Stitch Over 2 Canvas Threads

If you were to compensate this stitch by stitching 1/4, 1/2 and 3/4 of the stitch you would get:


1/4 Compensated Cross Stitch


1/2 Compensated Cross Stitch


Regular 3/4 Compensated Cross Stitch

You may remember from an earlier blog post, for the 3/4 compensated stitch, you do not want the compensating stitch to pull the other stitches out of line.  I have added a Modified 3/4 Compensated Cross Stitch diagram below that shows the first and third stitch diagrams broken into three separate stitches.  If you only had one diagonal stitch from lower left to upper right, when you stitched the shortened stitch into the center hole, it would have pulled the first stitch out of shape.  This is more obvious with larger cross stitches.


Modified 3/4 Compensated Cross Stitch

I have stitched some compensated cross stitches over 2 threads, over 3 threads and over 4 threads to discuss some of the finer points of compensation.

First, looking at the compensated stitches over 2 threads, the left side is stitched with a long first stitch and the second stitch pulling the long stitch out of shape (red arrow).  The right side is stitched as in the diagram above, with three short stitches (blue arrow).  If you do not see much distortion with the longer bottom stitch, then you may decide to use the regular 3/4 Compensated Cross Stitch.

Compensated Cross Stitch Over 2 Canvas Threads
Left Side - Regular Compensation           Right Side - Modified Compensation
Look at what happens when the stitch is over 4 canvas threads.  Again the left side is stitched with a long stitch and a short compensated stitch while the right side has the long stitch broken up into two stitches so that the short compensating stitch does not distort it.  The distortion in the long compensated stitch is more evident with the longer stitch.  Notice how in the compensated stitch on the left the long bottom stitch has more of an arc to it (red arrow) rather than a straight stitch as seen on the right side (blue arrow).  Look at your work and decide if you need to work a Modified 3/4 Compensated Stitch or just a regular 3/4 Compensated Stitch.

Compensated Cross Stitch Over 4 Canvas Threads
Left Side - Regular Compensation               Right Side - Modified Compensation
What happens when the cross stitch is over an odd number of threads?  In this case there is no middle hole to bring a needle up in to stitch a 3/4 stitch.  Look at the picture below:

Compensated Cross Stitch Over 3 Canvas Threads
Left Side - Regular Compensation             Right Side - Modified Compensation
The right side shows a somewhat 3/4 compensation, but not exactly.  I have traveled up one diagonal thread to start my compensating stitch.  It really does not look too bad this way because the partial stitch has the thread pulled tightly against the intersection.  On the left hand side I have pierced the canvas thread to achieve an exact 3/4 stitch.  This requires a sharp needle and you need to go down into the exact center of the intersection of the canvas threads - which is not always easy because one of the two canvas threads at the intersection will most certainly slide on you.  

The best advice is to try the easiest way to compensate first and really look at your stitching.  Does the line created by the compensated stitch look nice?  If yes, then continue in this way.  However, if not, then you need to use a Modified Compensating Stitch.

A more complicated situation arises when you are stitching an area on canvas that has an uneven edge.  Here is an example of a diagram in which the blue line represents the edge of the area where the cross stitch is to be stitched.  Just how do you determine how to compensate around this curve?

Fitting Cross Stitches to Line Drawn on Canvas
I have diagrammed one completed cross stitch.  To determine how much of the stitch to place next to and above this completed stitch I will look at the intersections of the canvas threads, which are the lines on the diagram, and compare them to where the blue line is located.

Determining Where to Place Compensated Stitches
Since I am stitching to the left of and below the line, at each of the intersections (numbered 1-5), I will look at whether the blue line is to the left or right of the intersection and above or below the line.  

My determination for stitching a compensating stitch will be:  
  1. If the blue line crosses in the middle of the intersection I will stitch over that intersection.
  2. If the blue line is above or to the right of the intersection I will place a stitch over that intersection.  
Note that this is the opposite of how I characterized the area that I need to stitch: to the left of and below the blue line.

So looking at the above diagram:
Circle 1:  The blue line is above the intersection -- Yes, place a compensating stitch
Circle 2:  The blue line is above and to the right of the intersection -- Yes, place a compensating stitch
Circle 3:  The blue line is below and to the left of the intersection -- NO
Circle 4:  The blue line is above and to the right of the intersection -- Yes, place a compensating stitch
Circle 5:  The blue line is below and to the left of the intersection -- NO

So here is how I would place my compensating stitches:

Compensated Stitches Fitted to Line

Some may be confused by my logic here and want to place a stitch across Circle 5.  This is a limited example and I do not have information about what is around and most importantly to the lower right of this area.  However, I still stand by my logic with respect to the blue line in this limited example and where to place stitches.  Consistency is the key to compensating success.


The execution sequence I am using to stitch these compensated stitches is included in the diagram below.  I have not included the numbers 6, 7, and 8 for the whole cross stitch in the lower left hand corner of the diagram because of space limitations.


Execution Sequence of Compensated Stitches
So, this blog covered the cross stitch when it was a square shape, i.e. the cross stitch covered the same number of threads vertically as horizontally.  Can you extrapolate this to larger squared cross stitches and to other stitches that use a square cross stitch as a base, like the smyrna cross stitch?

Next time I will consider the elongated cross stitch.  This cross stitch differs from the ones above because it covers a different number of threads vertically as compared to horizontally.


Saturday, December 29, 2012

Breaking the Rules


Let’s look at a diagram of a border:

Simple Border


This simple border is made up of two stitches, a slanted gobelin stitch and a horizontal gobelin stitch.  Not really hard to execute.  Everything look OK?

My stitched border:

Stitched Sample #1
I have used 1 strand of Silk & Ivory for the slanted gobelin stitches and 2 strands Watercolours for the horizontal gobelin stitches.  Other than the fact the horizontal stitches weren't laid, is it still looking OK?

I’m going to change threads and restitch the border:

Stitched Sample #2
Now I’ve stitched the slanted gobelin stitches using 2 strands Appleton wool and the horizontal gobelin stitches using 2 strands Silk & Ivory.  What do you think?  Does this look nice?

Don’t you think the top and bottom horizontal stitches, red arrows pointing to them below, flare out too much?  It almost looks like I’ve stitched too many horizontal stitches because they extend beyond the edge of the slanted gobelin stitches.


Flared Thread Problem
This problem existed in the first example at the top of this blog posting, but the Watercolour thread did not flare as much and the Silk & Ivory took up more room space at the top and the bottom of the slanted gobelin stitch.

Here is the rule I want you to break:  Follow the chart.

Many people who stitch from charts will follow the chart unless there is an error in the chart.  There is no error in this chart for some thread types, but it will produce problematic stitches with other threads.  So, look at your stitching after you follow the chart, does it look a little off?  Could you have stitched this a different way and made it look better?

In the sample below, I have made a small change to how I stitched the horizontal gobelin stitches and the resulting stitched sample looks much better.

Stitched Sample #3 - Problem Solved


Can you see how I solved the problem of the flare of the Silk & Ivory thread?

Here is what I did:

Simple Border - Redux

I’ve made a simple change to the border, and it will work with almost all thread types - perhaps a very thin sewing thread will not work, but most others will.

Here is how I stitched it:
I stitched tent stitches using 1 strand Silk & Ivory then stitched the horizontal gobelin stitches using 2 strands Silk & Ivory.

Problem solved and the results look much nicer.

A critical eye and no fear of not following the chart - that’s what everyone needs to bring to their stitching.