Let’s start the New Year with some blog entries about stitch compensation. Many people do not like stitch compensation, nor are they very good at it. It is my hope that I can help you learn how to figure out just what is the best way to compensate a stitch.
The next 4 blog entries will deal with 4 crossed stitches in depth and issues with their compensation. The stitches will include the cross stitch, the elongated cross stitch, the herringbone stitch and the Rhodes stitch. Hopefully, moving from an easy stitch to more complicated stitches will help you learn the thought process behind stitch compensation.
So, let’s start with the basic cross stitch over two canvas threads:
 |
| Cross Stitch Over 2 Canvas Threads |
If you were to compensate this stitch by stitching 1/4, 1/2 and 3/4 of the stitch you would get:
 |
| 1/4 Compensated Cross Stitch |
 |
| 1/2 Compensated Cross Stitch |
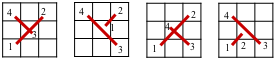 |
| Regular 3/4 Compensated Cross Stitch |
 |
| Modified 3/4 Compensated Cross Stitch |
I have stitched some compensated cross stitches over 2 threads, over 3 threads and over 4 threads to discuss some of the finer points of compensation.
First, looking at the compensated stitches over 2 threads, the left side is stitched with a long first stitch and the second stitch pulling the long stitch out of shape (red arrow). The right side is stitched as in the diagram above, with three short stitches (blue arrow). If you do not see much distortion with the longer bottom stitch, then you may decide to use the regular 3/4 Compensated Cross Stitch.
 |
| Compensated Cross Stitch Over 2 Canvas Threads Left Side - Regular Compensation Right Side - Modified Compensation |
Look at what happens when the stitch is over 4 canvas threads. Again the left side is stitched with a long stitch and a short compensated stitch while the right side has the long stitch broken up into two stitches so that the short compensating stitch does not distort it. The distortion in the long compensated stitch is more evident with the longer stitch. Notice how in the compensated stitch on the left the long bottom stitch has more of an arc to it (red arrow) rather than a straight stitch as seen on the right side (blue arrow). Look at your work and decide if you need to work a Modified 3/4 Compensated Stitch or just a regular 3/4 Compensated Stitch.
 |
| Compensated Cross Stitch Over 4 Canvas Threads Left Side - Regular Compensation Right Side - Modified Compensation |
What happens when the cross stitch is over an odd number of threads? In this case there is no middle hole to bring a needle up in to stitch a 3/4 stitch. Look at the picture below:
 |
| Compensated Cross Stitch Over 3 Canvas Threads Left Side - Regular Compensation Right Side - Modified Compensation |
The right side shows a somewhat 3/4 compensation, but not exactly. I have traveled up one diagonal thread to start my compensating stitch. It really does not look too bad this way because the partial stitch has the thread pulled tightly against the intersection. On the left hand side I have pierced the canvas thread to achieve an exact 3/4 stitch. This requires a sharp needle and you need to go down into the exact center of the intersection of the canvas threads - which is not always easy because one of the two canvas threads at the intersection will most certainly slide on you.
The best advice is to try the easiest way to compensate first and really look at your stitching. Does the line created by the compensated stitch look nice? If yes, then continue in this way. However, if not, then you need to use a Modified Compensating Stitch.
A more complicated situation arises when you are stitching an area on canvas that has an uneven edge. Here is an example of a diagram in which the blue line represents the edge of the area where the cross stitch is to be stitched. Just how do you determine how to compensate around this curve?
 |
Fitting Cross Stitches to Line Drawn on Canvas
|
I have diagrammed one completed cross stitch. To determine how much of the stitch to place next to and above this completed stitch I will look at the intersections of the canvas threads, which are the lines on the diagram, and compare them to where the blue line is located.
 |
Determining Where to Place Compensated Stitches
|
Since I am stitching to the left of and below the line, at each of the intersections (numbered 1-5), I will look at whether the blue line is to the left or right of the intersection and above or below the line.
My determination for stitching a compensating stitch will be:
- If the blue line crosses in the middle of the intersection I will stitch over that intersection.
- If the blue line is above or to the right of the intersection I will place a stitch over that intersection.
Note that this is the opposite of how I characterized the area that I need to stitch: to the left of and below the blue line.
So looking at the above diagram:
Circle 1: The blue line is above the intersection -- Yes, place a compensating stitch
Circle 2: The blue line is above and to the right of the intersection -- Yes, place a compensating stitch
Circle 3: The blue line is below and to the left of the intersection -- NO
Circle 4: The blue line is above and to the right of the intersection -- Yes, place a compensating stitch
Circle 5: The blue line is below and to the left of the intersection -- NO
So here is how I would place my compensating stitches:
 |
Compensated Stitches Fitted to Line
|
Some may be confused by my logic here and want to place a stitch across Circle 5. This is a limited example and I do not have information about what is around and most importantly to the lower right of this area. However, I still stand by my logic with respect to the blue line in this limited example and where to place stitches. Consistency is the key to compensating success.
The execution sequence I am using to stitch these compensated stitches is included in the diagram below. I have not included the numbers 6, 7, and 8 for the whole cross stitch in the lower left hand corner of the diagram because of space limitations.
 |
Execution Sequence of Compensated Stitches
|
So, this blog covered the cross stitch when it was a square shape, i.e. the cross stitch covered the same number of threads vertically as horizontally. Can you extrapolate this to larger squared cross stitches and to other stitches that use a square cross stitch as a base, like the smyrna cross stitch?
Next time I will consider the elongated cross stitch. This cross stitch differs from the ones above because it covers a different number of threads vertically as compared to horizontally.